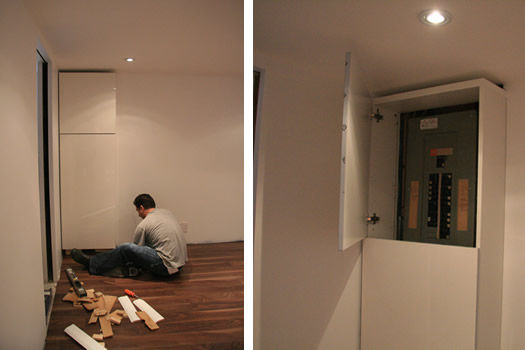
As much as I'd like to say that Aubrey and I came up with this genious plan, we spent a good 4+ months staring at the electrical panel wondering HOW we were going to deal with it. We knew it was going to involve building something infront of it - a closet, or maybe a bookshelf that swung out - but as my Mom pointed out, if you are trying to access the panel, it generally is in an emergency situation, so you want to access it quickly.
 Initially, when Aubrey asked how we would tackle hiding the panel, I refrenced a tip from Sarah Richardson. I had seen on a past episode of one of Sarah House where she encountered the same problem - how to hide an electrical panel. To hide the panel, she did a picture with hinges on the side, so that you could access the electrical panel by swinging the picture out. I remember tucking that piece of information away for a rainy day, and with our basement, the rainy day had arrived, and I was excited to use the same trick she had used.
I learnt, however, that her solution wasnt going to be ours. Our problem was that our electrical panel was too close to the new wall of the bathroom so a picture would look out of place hanging so close to a wall. It would be Obvious (with a capital "O") that we were hiding something.
The solution came from my Mom who suggested that we find a bookshelf where the top was doors, and the bottom was usable storage. It wouldnt look out of place, and also serve a purpose.
It was easier to address the solution once the walls were up and the floor was selected, as prior to that, we didnt really know how much room we would have. We settled on an IKEA cabinet, with the high gloss doors, to carry through the clean look of the new basement.
This is a new cabinet line at Ikea called Besta. I think that they come in the same widths as the Billy Bookcase system but they are about only 20cm in depth, vs. 28cm of the Billy system . We didnt want a very deep case, as it would start encrouching upon the pocket door for the bathroom. The Besta comes in a variety of finishes, we went with white, to blend in with the white walls.

Obviously, Mak the Cat was interested....


Although the width was perfect to hide the panel, and the depth was perfect so it didnt take up valuable floor space, the height needed some tweaking. To raise it off the ground we added in some blocks and we screwed the cabinet into the wall so that the weight of the doors wouldnt pull the cabinet down. As you can see, by opening the top door you can access the electrical panel.

When closed, it blends into the room. When open, you can see that the top functions at accessing the pannel, and the bottom portion we added in the shelves, that came with the unit, to store items like glassware + vases that I don't regularily need.

Aubrey added trim to the bottom to make it look built in
(Picture of Sarah Richardsons Laundry Room Design from HGTV.ca)


0 comments:
Post a Comment